A step by step tutorial: Transmitting particulate matter sensor data via PAN1781 Bluetooth® Low Energy module to smartphone app: Part 3
Receiving the data and displaying it on the smartphone
We have previously covered the necessary components and the software in the first part and the reading of the sensor in the second part. Now, let’s look at receiving and displaying the sent data with a smartphone.
Displaying the ASCII String with Connected by Panasonic App
If the PAN1781 is correctly flashed and connected to the PM sensor, we now need a remote station or an application that can receive the data that is transmitted via Bluetooth Low Energy®. Panasonic Industry offers an app for this, which can be downloaded free of charge for Android or iOS:
Search term: Connected by Panasonic
The Connected by Panasonic App is mainly designed to work with and provide information about Panasonic’s Wireless Connectivity modules. This app not only gives you an overview of the existing module portfolio, documentation and features but there are also dedicated demos.
AppStore: https://apps.apple.com/de/app/connected-by-panasonic/id1491976899
Google Play: https://play.google.com/store/apps/details?id=info.fiskado.de&hl=en_US
PIEU Website: https://industry.panasonic.eu/products/devices/wireless-connectivity/connected-panasonic-industry
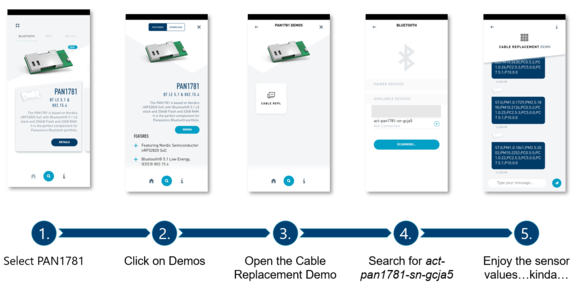
For the PAN1781 there is the cable replacement demo, which receives and displays a string sent via Nordic UART service. To connect to the PAN1781, follow the instructions below.
You can change the name of the Bluetooth device (here: PAN1781) in the source code. This can be done in the prj.conf in line 4 under CONFIG_BT_DEVICE_NAME. It is set to act-pan1781-sn-gcja5 by default.
When connected to the PAN1781, a window opens automatically and the strings are displayed one after another each second. Theoretically, we could end this article now, sit back and enjoy these values in this string containing letters and numbers. But humans like pretty things and shouldn’t we provide pretty tiles that display the values? It is possible to do just that, which leads us to the last part of this article: app development.
Mobile App Framework
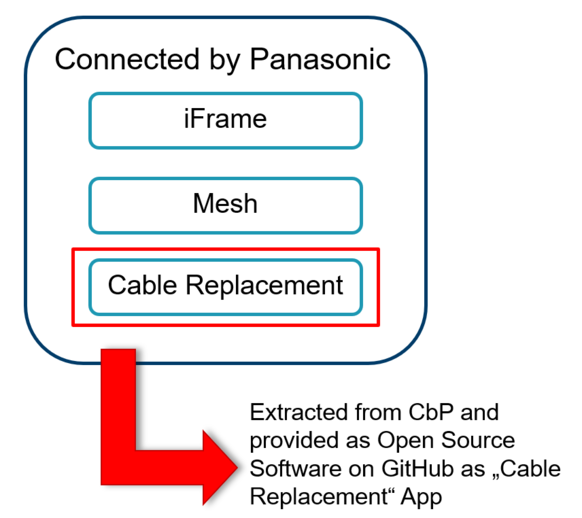
Panasonic Industry believes in the idea of an open-source community. With this in mind, the cable replacement demo mentioned above has been extracted from the Connected by Panasonic app and made available in source code form licensed under BSD clause 3.
This source code can now be found in the Panasonic Industry GitHub repository:
GitHub - panasonic-industry-europe/cable-replacement-app
Based on the Cable Replacement Demo, there is also a code that decodes (or “parses”) the string sent by PAN1781 and displays the values of interest in tiles. We now want to compile this code, build it, and transfer it to our Android smartphone:
GitHub - panasonic-industry-europe/mobile-app-pan1781-pmsensor-ble
This code can now be opened in our VS Code. The installation of the framework is described in the README section of the repository above. Please execute the steps as described:
- Install Node.js runtime [Note: Use LTS not Current]
- Install Cordova framework
- Install Ionic framework
- Install Android SDK.
The source code of the app may seem overwhelming at first glance, but basically, four parts need to be changed to see a result. The plan is to display the three-particle matter density values.
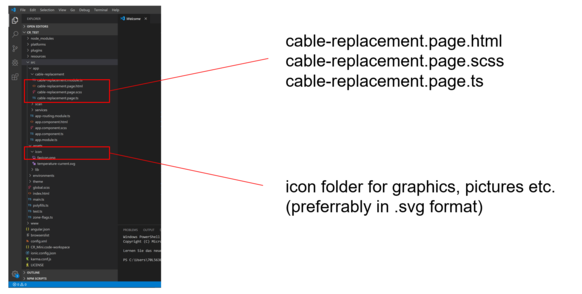
For editing alone, we focus on the three files related to cable-replacement.page.
HTML: Here we code in HTML code for everything which you can see in Webview.
SCSS: This page is used for styling the individual elements.
TS: The typescript page which is the logical part of the code.
The icon folder is a container for any graphics or pictures which you want to show in the app.
To extract only the dedicated value to a certain mass density value, an implementation of a parser is needed.
This is implemented in the typescript page in the getMessage function (line 112-140):
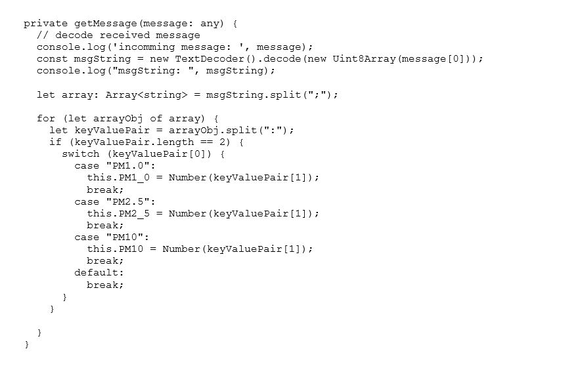
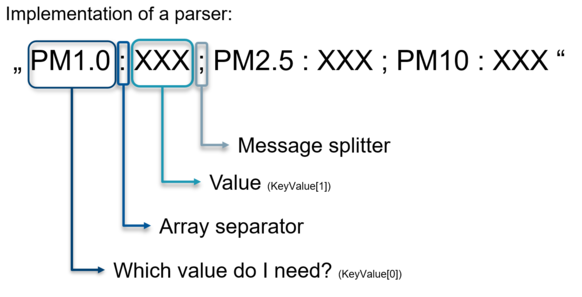
What exactly is being done there? You split the message into chunks which are always separated with a semicolon. And this chunk of the message will be divided into two array elements called keyValue. The identifier for the value is in KeyValue[0] and the corresponding value is in KeyValue[1]. The colon separates these two entries.
Building the code and deploying it to a smartphone
Now we want to transfer the application to our smartphone. To do this, we must first make the smartphone ready for deploying with the developer mode.
To do this, the following steps must be taken:
- Open the phone’s settings, scroll to the “About phone” selection and open it
- Click several times on the build number until the developer mode is activated.
- Now connect your smartphone to the PC via USB.
- Back in the settings menu, open the new selection “developer options.”
- Activate USB debugging.
If you have problems setting this up, please refer to the official Android Project documentation:
The following command in the VS Code Terminal in the project root compiles and builds the code and deploys the app to the connected smartphone:
ionic cordova run android
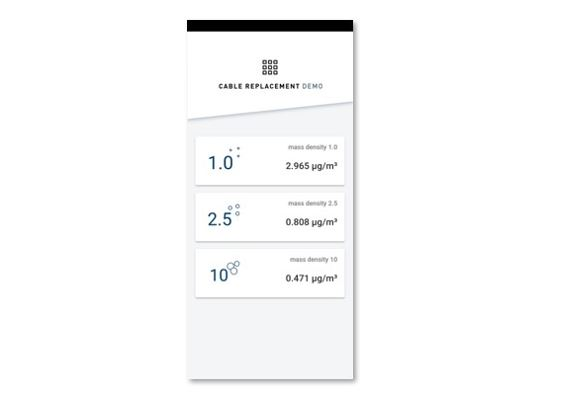
After the successful deployment, the app starts automatically and the “scan devices” screen appears. After connecting to the PAN1781 you can now see the updated values on the display of the smartphone:
The boxes on the screen are created in the HTML part in the containers of the class “own-scroll-container.” See below the example of the container for the 1.0μg value:
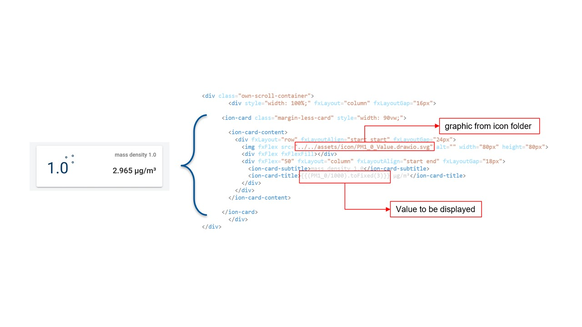
The whole code could in principle be extended to include more sensor data, like the sensor status, if you parse for the dedicated identifier in the string and store the value in a new variable, e.g. sensorStatus. This value could then be displayed in a new container with a separate image.
If you now breathe onto the sensor or stir up dust, you will see the values jump up.
That’s about it! We hope that we have been able to illustrate a hands-on use of Bluetooth® Low Energy connection and dispel any reservations with our little step-by-step guide. Give it a try – and do not hesitate to contact our Wireless Connectivity Experts at Panasonic Industry if you have any questions.